
How to turn your computer into a high precision packet capture machine with the Profishark 1G+

A look at the Profishark 1G+: Part 2
Welcome to the 2nd part of my Profishark 1G+ review.
I personally don´t like to take a capture without a proffesional capture device, because I like the feeling that I can trust the data which I see. And that I don´t need to consider about, if it has really happened on the network or was it just due to a capture error.
For example, once I have analyzed a 300 ms gap in a capture and in the end it turned out, that it just was a capture error; the problem never occurred on the network.
So far so good…
But there are just a few small hurdles with this equipment, either they are relative expensive or you have to build your one system with a proffesional capture card…
All this are not that smart things I wanted to do. So my dream was to have a handy and affordable out of the box device. But mostly my searches ended up in regions above 10k € or I had to make some compromises in the performance or precision.
But as I already told in my first part about the Profishark 1G+ I heard about the Direct Capture feature of the Profishark series. And in this part I will explain the Direct Capture feature and test the different capture modes of the Profishark.
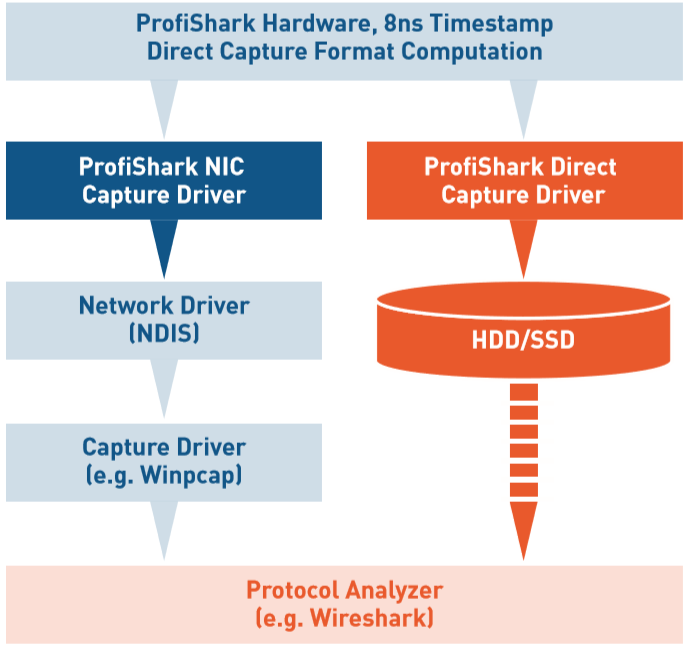
The Direct Capture feature:

We can see, that the Profishark works in local capture mode more or less like a normal network interface, the laptop has to capture the data, convert it into a PCAPNG file and a write it to disk.
But then we have the Direct Capture mode. And in the Direct Capture mode the Profishark will capture the data, time stamping it and cast it into a PCAPNG format.
And in the end the laptop has only write this stream to disk.
Setting up the Direct Capture:

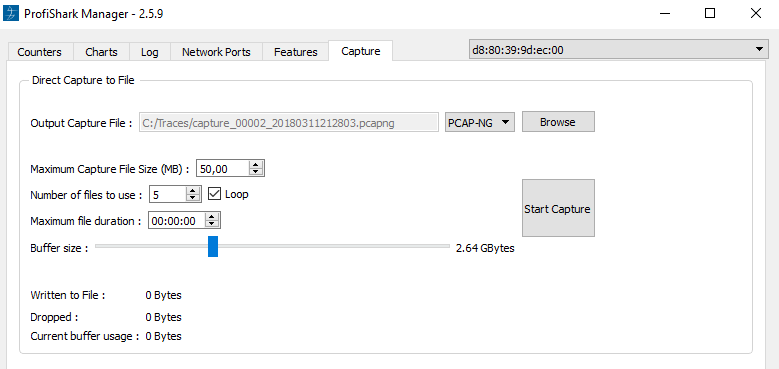
The Direct Capture setup will be done within the Profishark Manager at the Capture tab. First of all you can define the destination of the capture file. The Profishark will add start date and time to the file name as an indices. So you can leave the name the same and if you start and stop a new trace a new file set will be used. That´s a very very important function, because so you will never delete a trace file by starting a new capture.
The files are organized as a ring buffer file set and works more or less the same like the ring buffer in Wireshark.
You also can specify the amount of buffer size, the buffer is used, when the data could not be written to disk.
At the end of the dialog we three statistic values:
- Written to File: The amount of data we have already captured
- Dropped: The most important value here, because we can see how reliable our trace file will be. If there is a 0 then we have a very reliable capture file.
- Current buffer usage: This shows us the actual buffer usage. During my tests I have only spotted 512 kb here. This shows how efficient this capture method is.
Capturing in Direct Capture mode:
As I have made a lot of test with the Profishark at a filled up 1 GBit/s link (see below). It was interesting to see that in the Direct Capture mode the laptop was not very “impressed” by it. The CPU load on my laptop went up just around 1 – 10% and the system feels all the time very responsible, almost as it is in idle mode.
The Test:
The Theory:
First of all we have to do some theory stuff.
Most of you know that 1 GBit/s traffic is not always the same for network equipment, as it is easier to reach the 1 GBit/s with large frames.
The maximum number of frames per second on an ethernet link depends on the frame size.
For example if there are just 1500 byte frames; 1 GBit/s will be reached with 82 237 frames per second.
But if the frames are just 64 bytes long then we need 1 488 095 frames per second to reach the 1 GBit/s.
(Who is interested in this topic: I have written a small tool for calculating the number of maximum frames called: FrameGapCalc.xlsx)
So as we can see not only the speed is interesting to most network devices, the capability of frames per second is an important value, too.
For example if a normal system has to deal with only 64 byte frames it will stress your system more than if you only have to deal with 1500 byte frames.
Now with knowing that, we can see, that is harder for systems to capture data which contains a lot of small frames and to do it in reliable way it is even more hard.

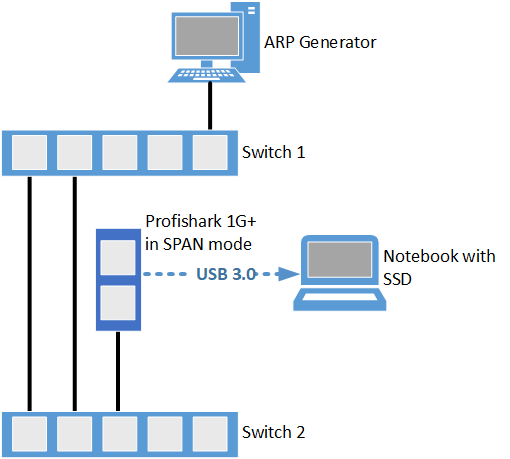
Testsetup:
So as I don´t own a professional traffic generator I have used the following test setup:
1. Two switches connected to a loop
2. An ARP generator which sends one ARP (64 byte) frame, if I click a send button
3. The Profishark 1G+ on a switch port in SPAN mode. I just wanted to measure 1 direction, because I want to measure the framegap on one direction.
4. A Lenovo T540p with an SSD
The expectation is that we see 1 GBit/s and a framegap of 672 ns.
The Testcases:
I have tested the different capture modes of the Profishark.
- Local capture
- a) Without hardware time stamping
- b) With hardware time stamping
- Direct capture mode with hardware time stamping
I have tested all three modes and I will present the results now:
The Results:
The expectation is that we see around 1.4 million frames with a framegap of 672 ns (+- 8 ns).
1.a) Local capture without hardware timestamping
(Link -> LocalCapture_Without_Timestamp_1s.pcapng)
- Dropped packets = around 900 MBit
- Captured Packets = 131 535 in 1 second
- Average bit/s = 71 Mbit/s
- Time delta between frames = 0.4µs – 0.40 µs
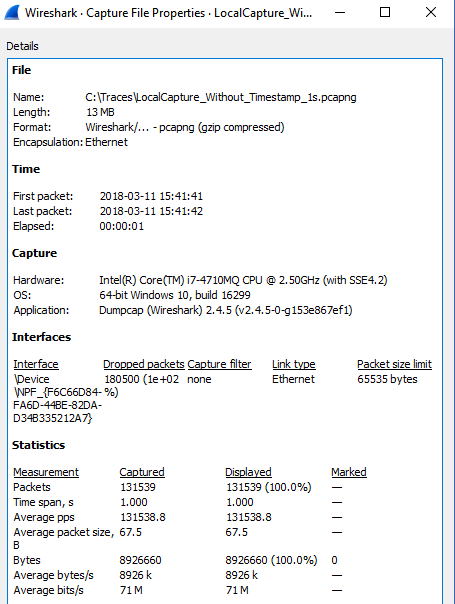
We can see that whether the timestamps nor the amount of captured frames satisfies our expectation. To be fair I have directly captured in Wireshark with just disabling all capture option check boxes in Wireshark, maybe a windump trace leads to better results (But this is stuff for another article). The only good thing here is, that we can see that a lot of packets have been dropped while capturing. So a reliable analysis about the framegap and used bandwidth on this link is not really possible, with this trace.
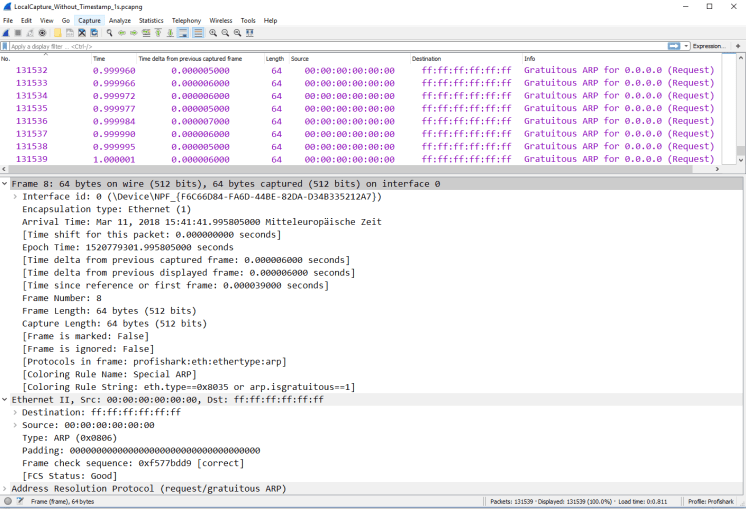
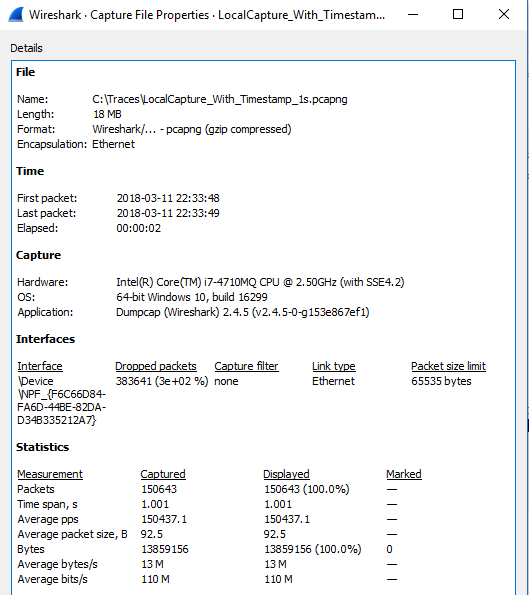
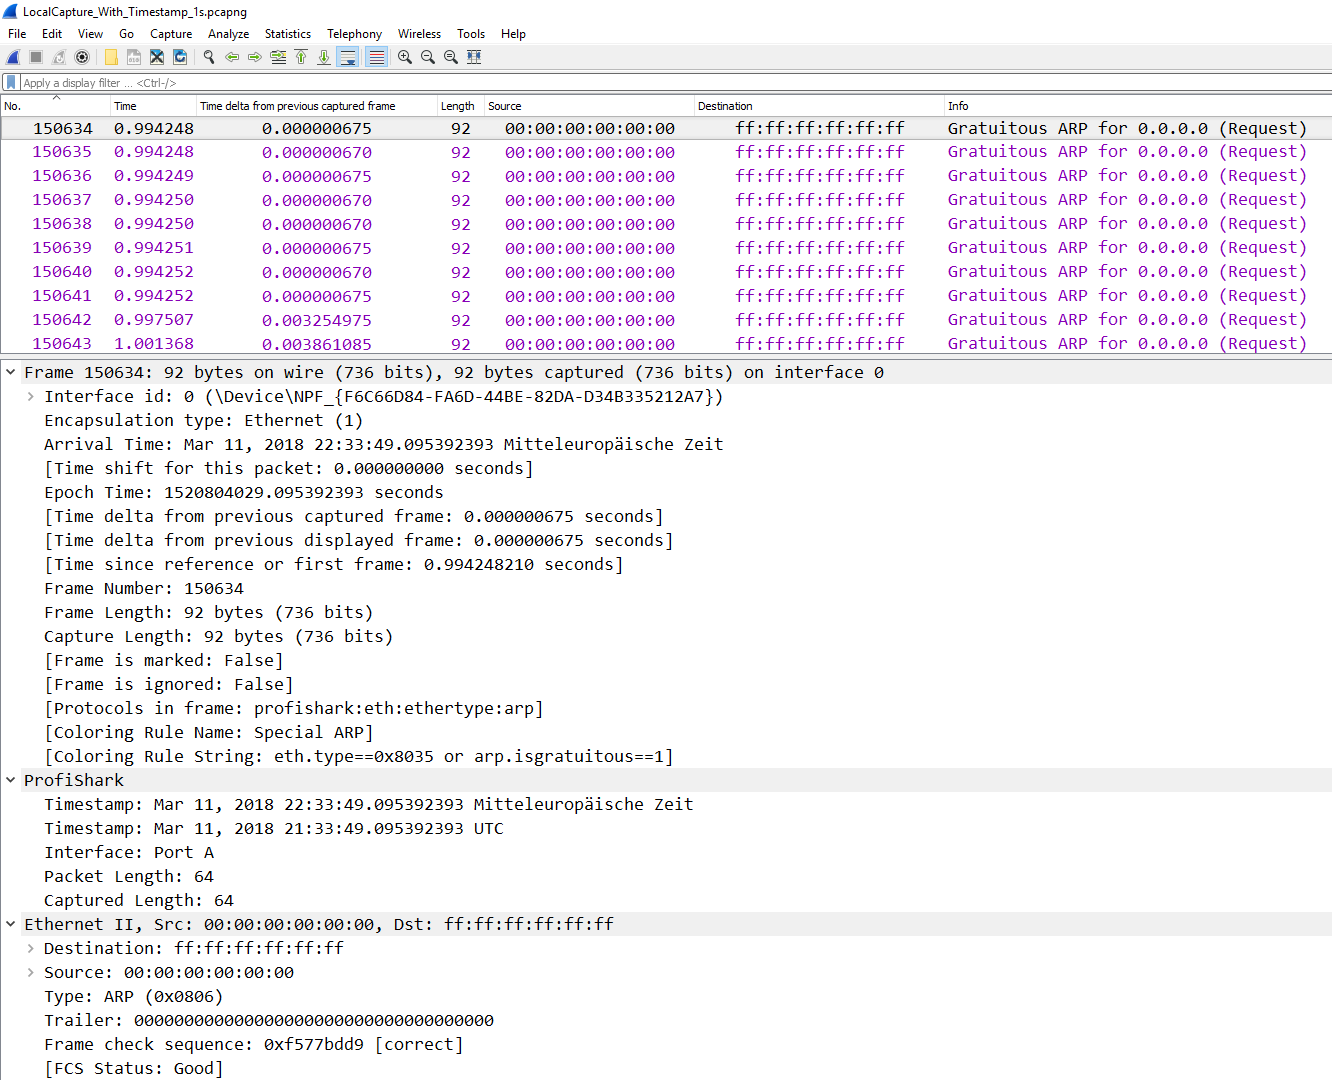
1.b) Local capture with hardware timestamping
(Link -> LocalCapture_With_Timestamp_1s.pcapng)
- Captured Packets = 150643
- Average bit/s = 110M
- Dropped packets = around 890 MBit
- Time delta between frames = 670ns – 7,5 ms
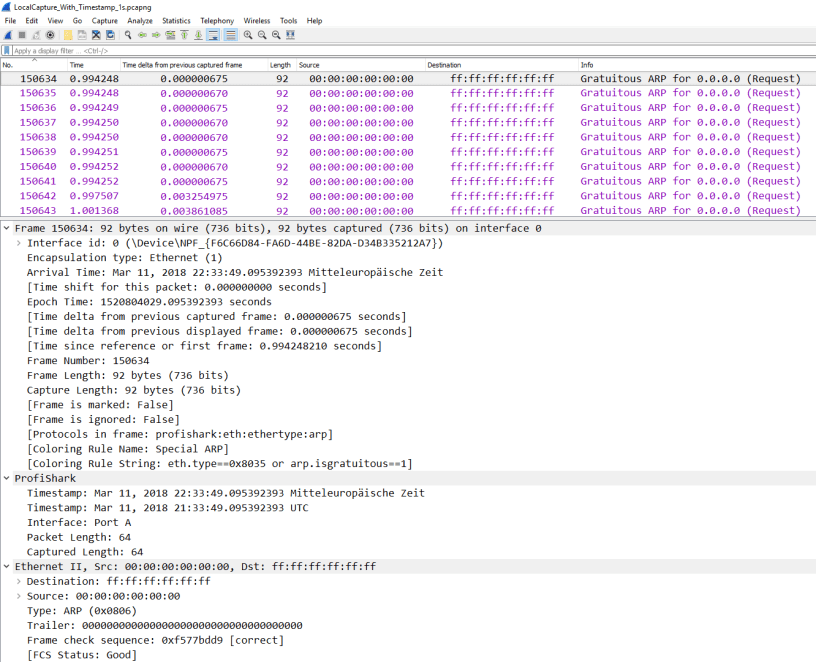
We can see one big difference the new Profishark header. This header is added by the Profishark device during capturing and contains the correct timestamp with a 8 ns resolution.
One advantage of that, is that Wireshark sets the “Arrival Time” of the frame in the Frame header to the same value. So we are able to work with the correct time values with the normal time features of Wireshark. The side-effect of this header is, that we can analyze this trace since now only in Wireshark. As I have used the same capture method as I mentioned before, we still can see a lot of packet drops. But there is one big difference to me. I can see now that in some cases the link is totally filled up. See Frame 150534 to 150641 we can see the correct ffamegap time. So now I have at least a clue what is happening on the link. So from my point of view it make the capture more reliable and better.
2.) Direct capture mode
(Link -> Directcapture_with_hardware_timestamp_1s.pcapng)
- Captured Packets = 1488163
- Average bit/s = 761M (at Layer2) – infact it is 1 GBit/s (at Layer1) more is physically not possible
- Dropped packets = 0
- Time delta between frames = 660ns – 675 ns
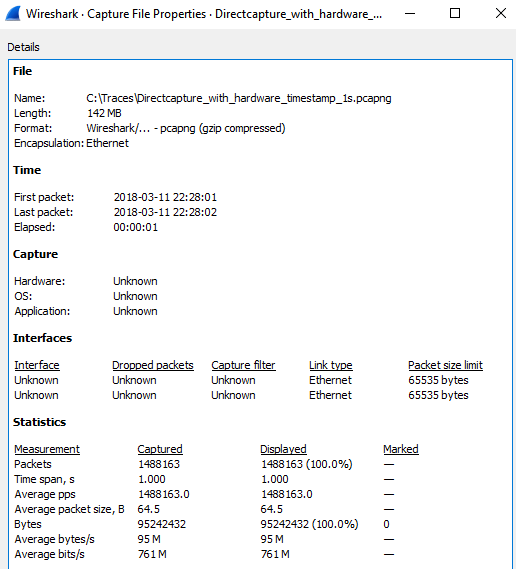
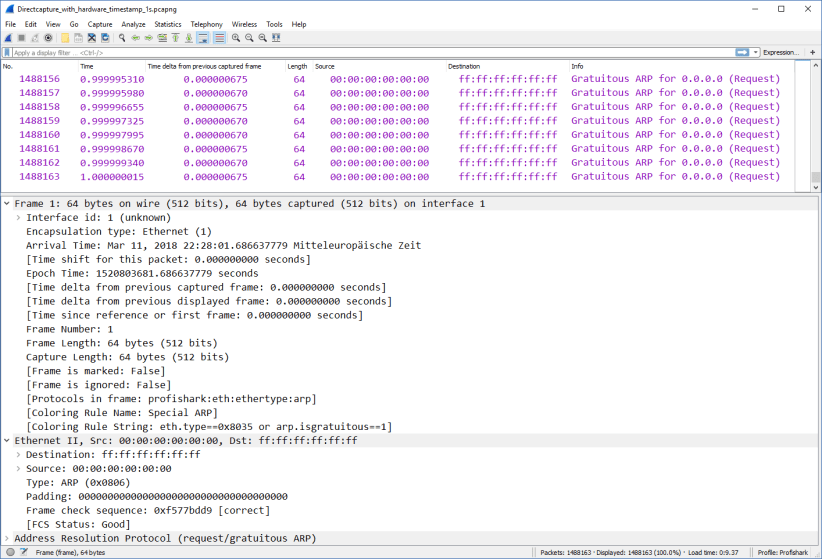
So as we can see we have no packet losses in Wireshark and also the time deviation is more than reliable. So we can see here more or less a perfect capture with an impressive capture performance of over 1.4 million frames per second. We see that the 1 Gbit/s link which is totally filled up with 64 byte frames. This is really an impressive trace at least from my point of view. This trace fullfills the test expectation totally.
By the way:
The datasheet of my Netgear GS305 switch shows, that the switch is able to forward 1.488 million frames per second. So as a sideeffect, I also have verified the datasheet of my switch.
Final Words
The not so well-known “Direct Capture” feature of the Profishark series was very surprising and impressive to me. So in my opinion the Profishark is more or less also a precise capture device for me, now. The guys of Profitap has told me about that feature but I couldn´t believe it. But the test results of the Direct Capture feature are a impressive and reliable. So with knowing that there might be more use cases than just the tapping functionality.
By the way Profitap has ported the Profishark manager on a Synology disk station, they call it a long-term capture solution. But as I don´t own a Synology system I can´t tell you more details about that feature.
At the end I would like to say thank to the guys of Profitap for providing me a demo Tap for this small review here.
First part of the serie:

Thanks for sharing.
Is the “Direct Capture” only available on Windows or also with Linux?
LikeLike
Hi Uli,
thank you for your comment.
The “Direct Capture” is also available with Linux via CLI and GUI.
LikeLike